Open Training
As a second option you can also conduct an open training. This is compared to the procedures a bit more complex. We therefore explain a typical open training session which consists of 4 training phases.
Preparation and start
- Follow the first steps of preparation from the previous chapter and choose an open training in the selection screen after starting the app
- Now start a free measurement (simply press “Start” in the main screen) and take a first look at the measured values of your pulse rate. An adult’s resting heart rate is usually between 60-80 heartbeats per minute. You will immediately see this value as the current measured value with the unit “HR” (heart rate).
- In order to to be able to compare sessions optimally, you can set the time for a measurement in the settings of the eSense App and limit it to a value, e.g. 10 minutes. The measurement then stops automatically after this time has elapsed. In the default setting of the eSense App, the measurement duration is unlimited. It is recommended to set a time after the first experiments and to adjust the settings to correspond to the desired, regular training duration. This way, you will get an optimal evaluation and be able to compare your training sessions later on.
First stage (observe and experiment; determine your initial status)
- First, determine a 10-minute baseline (default state without influence) at rest. It is very important to always compare measurements of the same length, so use the option in the settings to set the session length to a fixed duration. Now set the session length to 10 minutes.
- Try to relax as much as possible and DO NOT observe the measured valuesduring these first 10 minutes, this would compromise the measurement.
- Use your breathing to relax, breathe calmly, deeply and evenly as you feel comfortable.
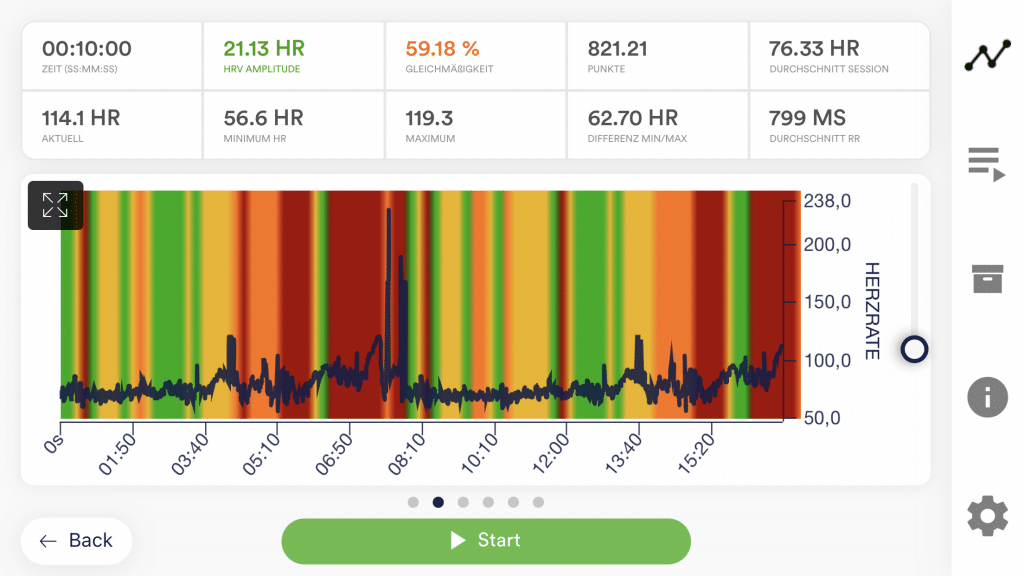
- Keep your smartphone or tablet in landscape mode. Look at your HRV curve after the first 10 minutes. Were there sections of an even curve? Were there strong fluctuations and irregularities? How do you rate your ability to relax during the measurement? You may already be able to determine a connection between the curve and the tension or relaxation you feel. If not, no problem – this will come. Good relaxation goes hand in hand with high heart rate variability and an even curve. Distractions and irregular breathing will result in a decrease in HRV and an irregular curve.

- After completion of the 10-minute baseline, you will first be shown a survey. Answer the questions and make notes if necessary. You will then see a pie chart showing you the time when HRV has increased, decreased or remained the same. The more HRV has risen, the better. Next to the pie chart, you will see a table with measurements and statistics. These are used to assess your condition and compare training progress. In the article explanation of the individual measured values, all parameters of the eSense App and their meaning are explained clearly in detail.
- This is now your initial training status. Of course, the respective day also plays a role: It should make a difference whether you measure after a stressful working day (or even during work) or at the end of a relaxed weekend. Use the corresponding function of the app to export this baseline as a CSV file. You can do this by calling up the measurement in the archive. With this, you can later (besides the archive) also access your baseline in other ways (e.g. in Excel). You can also export a PDF file of curves and statistics from the archive.
- One more tip: If the measured values are disturbed for no apparent reason, the skin contact was not optimal, or the sensor was electrostatically charged. To “discharge” the sensor, remove the battery once and reattach the sensor to the chest strap without the battery for a few seconds. Then reinsert the battery. Use sufficient electrode spray and repeat the measurement.
Second training phase (targeted biofeedback training based on the measured values)
- The second training phase consists of several measurements, which should always be carried out according to the scheme described below. You should practice targeted relaxation with the help of feedback.
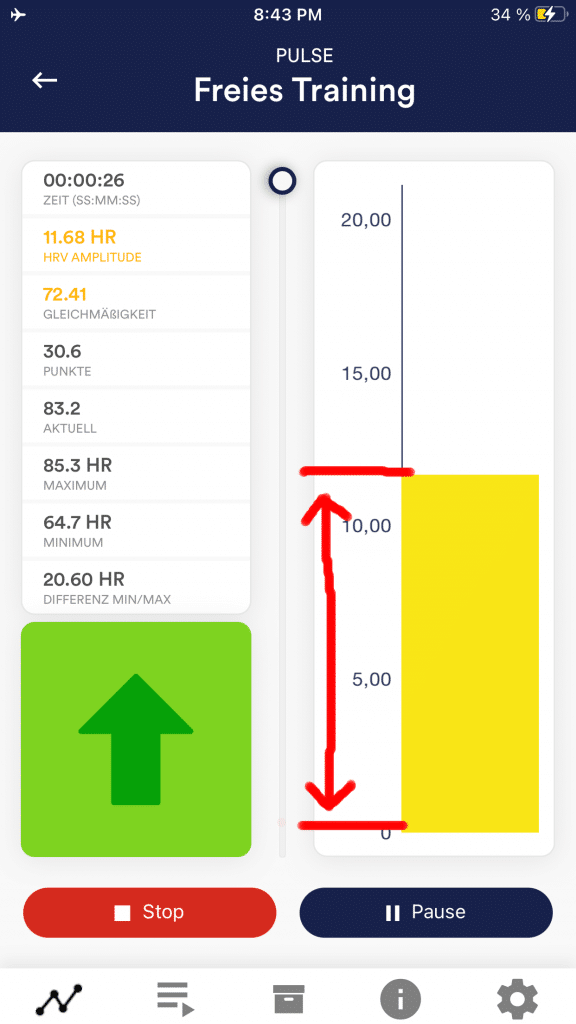
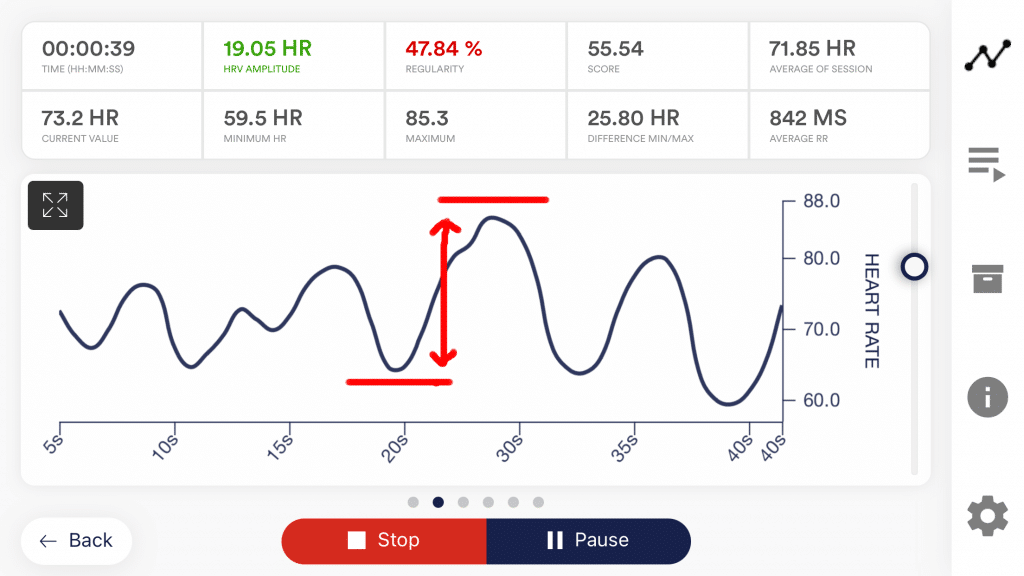
- Start the measurement and observe your measured values for a while. The aim now is to increase the amplitude (i.e. the size) of the heart rate variability. In the main screen of the app in portrait format, you see the amplitude in the form of a bar. This is the most direct form of display. In landscape mode, you see the HRV amplitude as a numerical value.


- First of all, try to increase the HRV amplitude by relaxing and breathing calmly and evenly. You can test different approaches and techniques of relaxation, such as conscious control of breathing (deep inhalation and exhalation), muscle relaxation, auto suggestion and much more. Here, your joy of experimenting is in demand! The device gives you precise information about the resulting effects. Also observe small changes in the measured values. Remember the maximum HRV amplitude you could achieve.
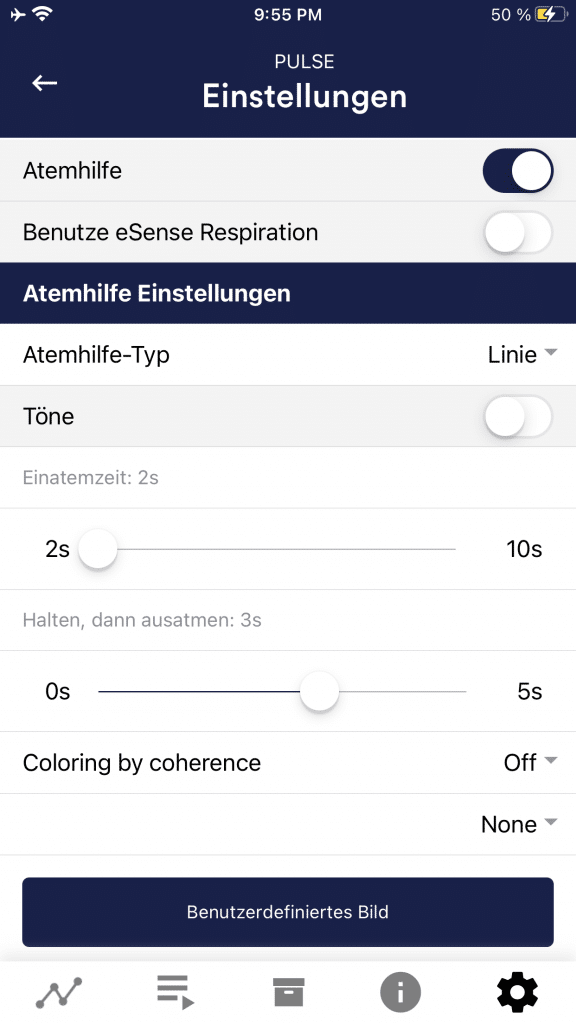
Practice an increase in heart rate variability, including the breathing aid. You can activate the breathing aid in the app settings, it is not active by default. Activate it and start breathing training at your usual breathing rate. This will, in most cases, be between 12 and 15 breaths per minute. This is faster than quiet breathing during deep relaxation. However, it is easier to start with your “normal” breathing first and then gradually slow down your breathing pace to below 10 breaths per minute. Set the inhalation and exhalation times in the breathing target as desired. (For 15 breaths, set 2 seconds for inhalation time and 2 seconds for exhalation time, or 3 seconds for inhalation and exhalation time if you want to try 10 quiet breaths per minute). It is helpful to breathe out a little longer than in.
- Here is an example of a first exercise at 12 breaths per minute:

(5 Sekunden pro Atemzug / 12 Atemzüge pro Minute)
- Train using the different biofeedback features the app offers. In landscape mode, you also have the breathing aid as a line. You choose a video, which stops when the HRV amplitude falls and continues when it rises. You can also use music and sounds that you can activate in the settings. The individual feedback functions are all described in more detail in the corresponding chapter of the manual.
- Use the supplied procedures! This allows you to get to know the different functions of the app even better and to perform standardized training. If you like, create your own individual procedure with your favorite feedback variants.
Third training phase (provocation, relaxation and stress management)
- In the third training phase, stress stimuli are used in order to train stress management. HRV biofeedback is well suited for using targeted provocation methods, as it shows a timely and sensitive reaction to a stimulus, and also because this reaction is also proportional to the strength and significance of the stimulus.
- Start the measurement and observe your measured values for a while. Then try to relax. The training begins with a resting phase of a few minutes.
- Now a stressor (stress stimulus) should be used. Examples are: negative thoughts, looking at emotionally charged pictures or objects, as well as unpleasant noises. As a rule, everyone knows things that make them tense or excited. For example, if you do not like to speak in front of large crowds, try to make a speech spontaneously or imagine this situation. If such a stressor acts on you, observe the readings and you will probably see a drop in HRV amplitude and a more irregular curve. Then, try to increase the amplitude again and make the curve even again.
- During a training session, you can alternate phases of relaxation and stressors about three to four times. Always end a session with a rest phase and do not overtax yourself. Do several training sessions over a longer period of time until you feel you are less sensitive to stressors or recovering more quickly.
Fourth training phase (transfer, relaxation even without feedback)
- Now you should check whether you have been successful in your training and whether you have already gained the ability to relax without feedback. To do this, carry out another 10-minute baseline measurement and try to relax as much as possible. DO NOT observe the measured values. Only consider how this measurement behaves in comparison to the baseline from the first training phase afterwards. In the archive, it is possible to compare sessions with each other. It is to be expected that many values have improved. Of course, your daily form also plays an important role here. Repeat the baseline measurement later if necessary. It is very important to always compare measurements of the same length, so use the option in the settings to set the session length to a fixed duration then it stopes automatically.
- As another transfer exercise, you can work with a stressor again and then try to relax, NOT observing the measured values. Check afterwards whether you succeeded in improving your measured values. If you succeed in this and the comparison with the first baseline also shows a clear improvement, you have successfully completed successful stress reduction training. If you now find yourself in a stressful situation in everyday life, think of your training sessions. Stay relaxed by using the skills learned here. The same applies here: Regular practice makes perfect!
- Our eSense App offers free training as well as the use of procedures. These are ready-made training programs which you can customize according to your wishes. For an optimal comparability of training sessions, they should always be carried out under identical conditions (e.g. same time of day) and with identical length. The procedures are a great help. You can read more about this in the corresponding section of this manual.
Questions